Comprehensive Guide to the Rails Upgrade Process
Thinking about upgrading your Rails app? Discover key challenges, practical solutions, and top tools to streamline your upgrade process.


Pichandal
Technical Content Writer


Upgrading Ruby on Rails application is a crucial move for any business. It ensures your stack remains compatible and secure while unlocking access to the latest features and improvements across the Rails ecosystem.
Sticking with an older version might seem safe if your app is running smoothly, but over time, that stability can turn into stagnation, leaving you vulnerable to security issues, gem incompatibilities, and rising maintenance costs.
On the other hand, it also makes it easier to attract and retain developers who prefer working with modern stacks.
Most teams decide to upgrade Rails when:
- They need to adopt a newer Ruby version
- A key gem drops support for older Rails versions
- Compliance requirements demand supported software
- Performance issues point to older framework limitations
- The product roadmap calls for major refactors or improvements
This guide is designed for teams who know a Rails upgrade is on the horizon but want a clear, realistic view of what the process involves. Whether you’re a CTO planning ahead, a tech lead weighing risks, or a developer about to step into the upgrade, this guide will help you approach the upgrade with the right information and mindset.
Overview of the Rails Upgrade Process
At its core, a Rails upgrade is moving your application to a newer version of the framework while keeping everything else working as expected. But in practice, it’s not just a version bump. You’re updating the Rails foundation, aligning your dependencies, adjusting custom code, and making sure your app behaves the same or better after the switch.
What is actually involved?
The upgrade process usually includes:
- Updating the Rails gem and related dependencies
- Resolving deprecations and breaking changes in your codebase
- Ensuring test coverage is strong enough to catch regressions
- Running your full test suite and fixing what breaks
- Validating performance and behavior in staging before deploying to production
Understanding version jumps
Not all upgrades are created equal. Moving from Rails 7.2 to 8.0 is typically less complex than jumping from 6.1 to 7.1. The bigger the gap, the more deprecated features and incompatible gems you’ll have to deal with. Skipping multiple major versions often means updating in stages, testing each version along the way.
Some upgrades may also require a Ruby version bump, which adds another layer of work, especially if your existing gems or libraries don’t support newer Ruby releases.
The main phases of a Rails upgrade
A typical upgrade process follows these stages:
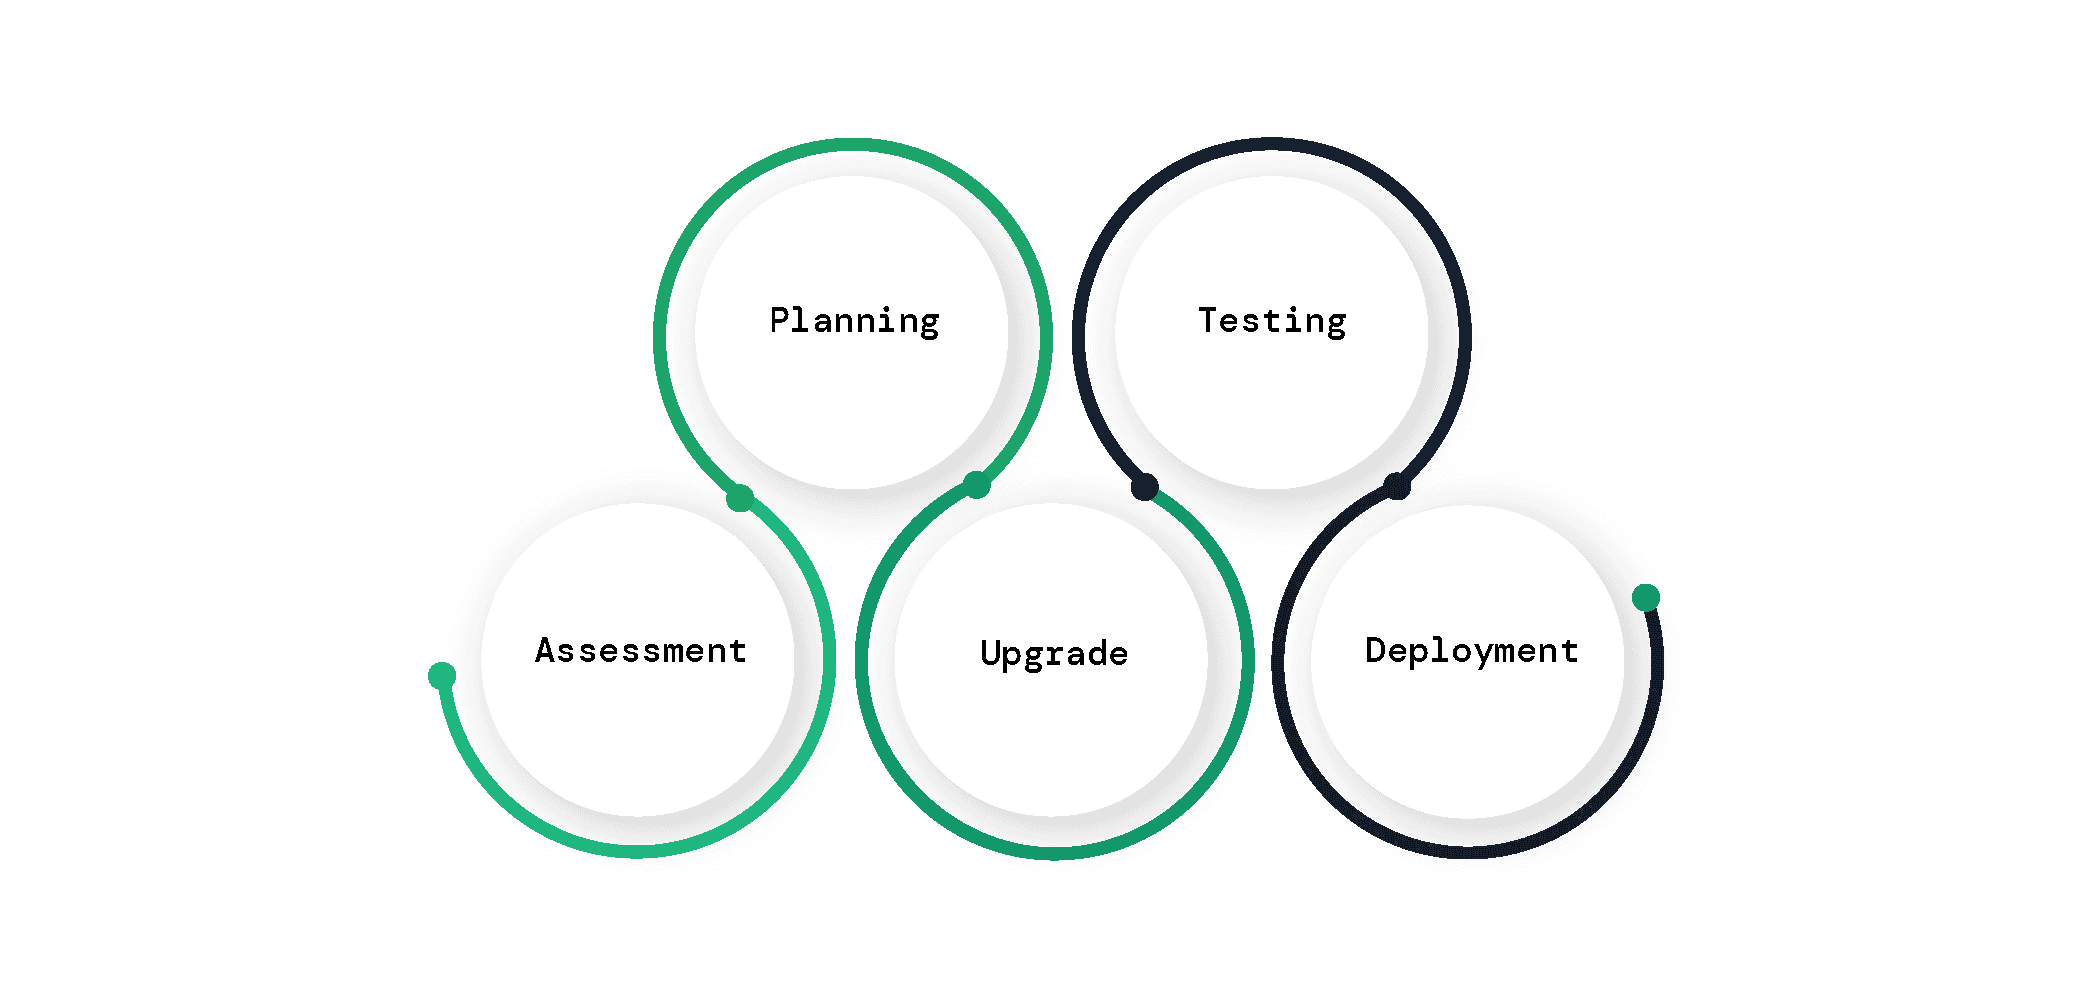
Assessment
Audit your Rails and Ruby versions, gem dependencies, test coverage, and known blockers.
Planning
Break down the work into manageable milestones. Decide whether you’ll upgrade in-place, stage by stage (phased approach) or a dual boot setup.
Upgrade
Update Rails and Ruby (if needed), adjust the codebase, and resolve deprecations or API changes.
Testing
Run the full test suite, add coverage where needed, and perform manual QA to verify business-critical flows.
Deployment
Roll out the upgraded version to staging first. Monitor closely during production rollout and have a rollback plan in place.
This structure keeps the process grounded and helps your team stay in control, even when unexpected roadblocks come up mid-upgrade.
Key Considerations Before Starting an Upgrade
A successful Rails upgrade starts well before the first gem update. Skipping the prep work is one of the fastest ways to run into blockers mid-upgrade. At RailsFactory, our expert RoR developers follow a proven pre-upgrade approach to surface potential issues early and set each project up for success. Here are the key considerations to sort out before you touch your Gemfile.
1. Audit your current Rails version and dependencies
Start with a clear snapshot of your current setup. Use tools like Railsup, rails --version, bundle outdated, and the rails_upgrade gem (if applicable) to see what needs attention. Outdated gems are often the biggest reason upgrades slow down or stall.
2. Identify deprecated features and APIs
Rails usually flags deprecated methods long before removing them. Check your logs for deprecation warnings and consider tools like rails_deprecated_sanitizer or even a simple grep to locate risky code patterns. Replacing deprecated logic early will save time when the upgrade is underway.
3. Review major gems and third-party plugins
Your app likely relies on gems that tie closely to specific Rails versions. Before upgrading, check whether those gems actively support the target version. Read changelogs and open issues. If a gem is no longer maintained, start evaluating replacements now — not mid-upgrade.
4. Strengthen your test suite
If your test suite is unreliable, you’ll be guessing whether the upgrade broke anything. Patch flaky tests, add coverage to risky areas like callbacks and metaprogramming, and double down on any logic tied to user flows or billing. A dependable test suite is your safety net.
5. Back up your database and codebase
This should go without saying — always take full backups of your database and code before starting the upgrade. If something goes sideways, you'll want a fast way to revert to a known stable state.
6. Confirm Ruby version compatibility
Most major Rails versions increase the minimum required Ruby version. Make sure your app and its dependencies support the Ruby version required by your target Rails version (Using Rails compatibility checker can make the process easy for you!).
If not, plan for a Ruby upgrade as part of the process.
7. Don’t forget background jobs, services, and APIs
Upgrading Rails affects more than just your main app. Background jobs (like Sidekiq), internal services, and public APIs may rely on routing behavior or serialization logic that changes across versions. Make sure these are accounted for in your testing plan.
8. Avoid high-risk deployment windows
Schedule the upgrade outside of major product launches, marketing pushes, or critical business cycles. Give your team enough breathing room to test, roll back, and re-deploy without unnecessary pressure.
9. Align with your deployment environment
If you’re using Docker, Heroku, ECS, or another cloud setup, check if you’ll need to update base images, secrets, or buildpacks. Environment misalignment is a common cause of post-upgrade bugs.
10. Get your team aligned
Communicate early with everyone involved. Share timelines, assign ownership, outline rollback strategies, and define branching rules. The more visibility your team has, the smoother the upgrade will go.
Common Challenges and How to Overcome Them
Even straightforward Rails upgrades can run into complications. Knowing where things typically break and how to handle them can save your team a ton of back-and-forth. With nearly 18 years of providing Ruby on Rails services, we’ve seen just about every upgrade challenge out there — from subtle dependency conflicts to major architectural mismatches. Here’s a breakdown of common roadblocks and how to tackle them.
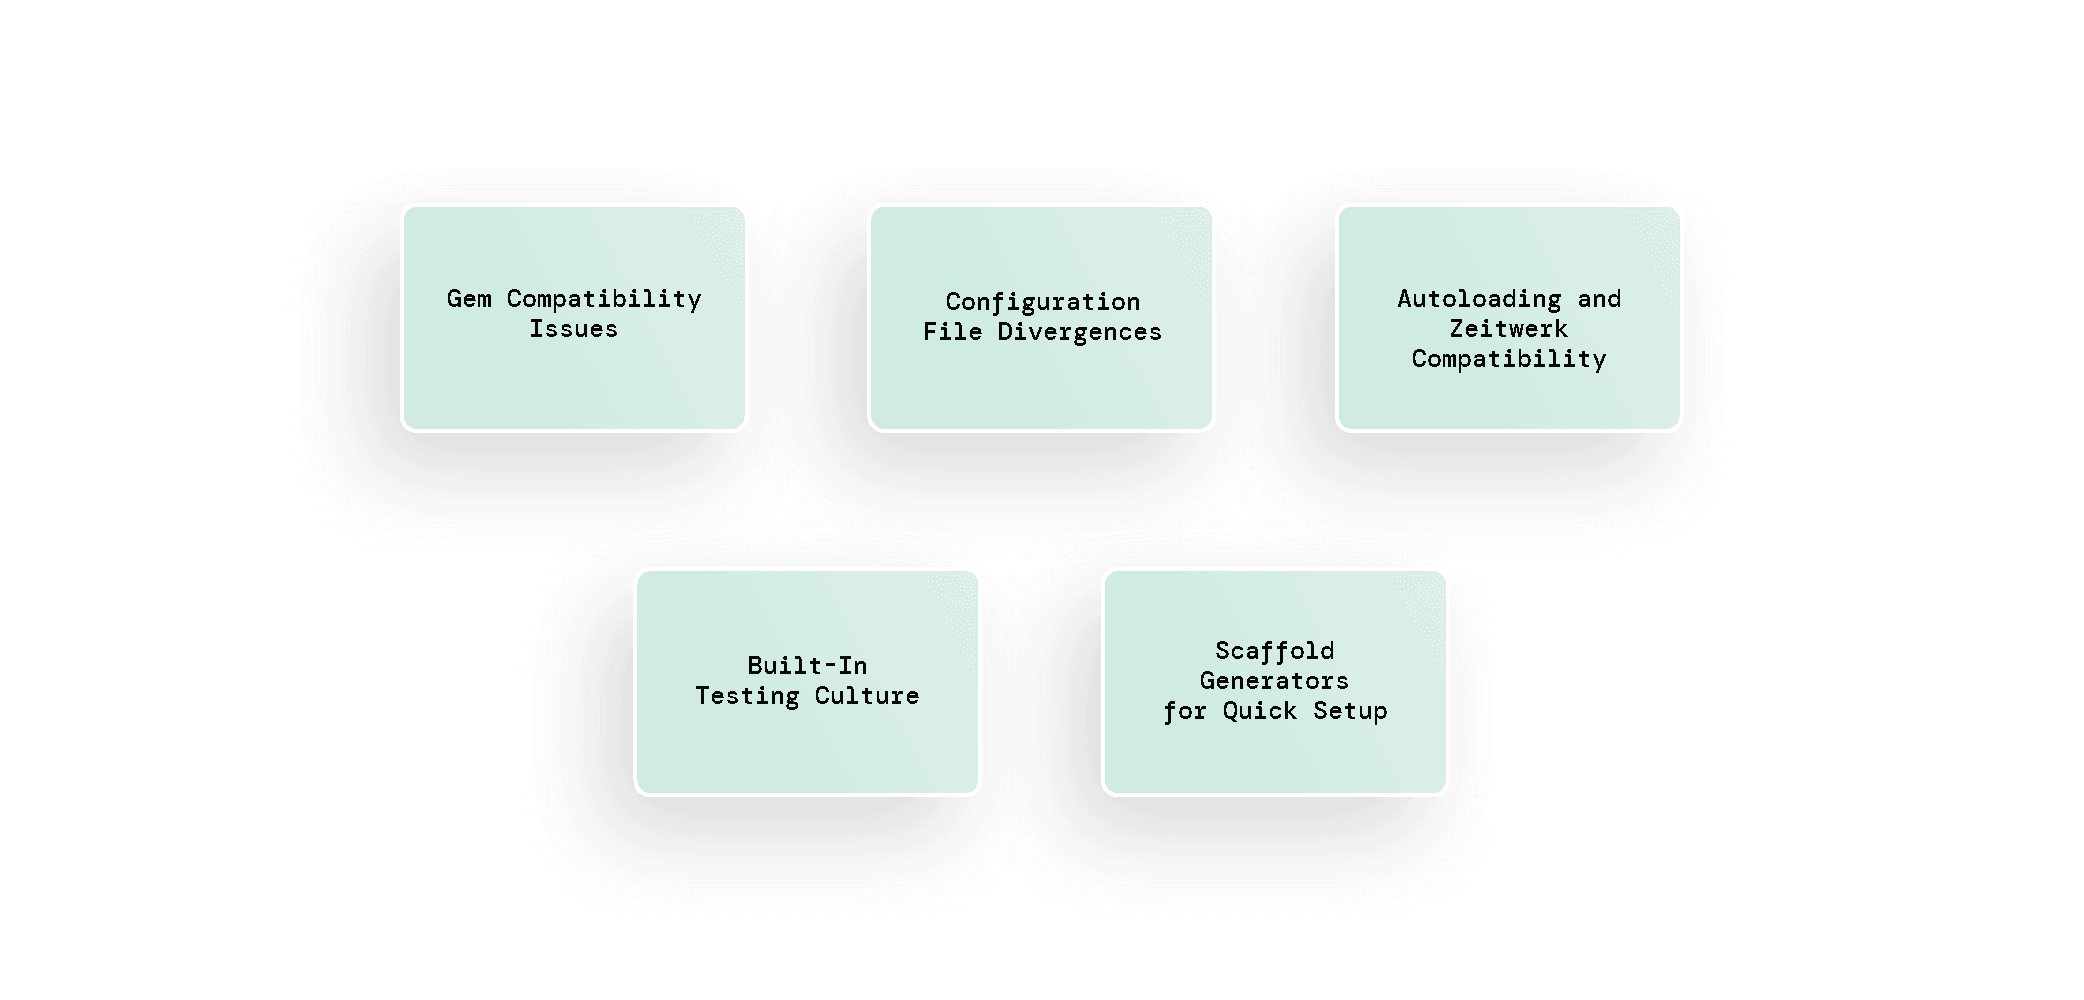
Gem Compatibility Issues
What breaks:
Some gems just aren’t ready for newer Rails versions. You’ll either get errors during bundle update or find methods missing at runtime.
What helps:
-
Pin your current gem versions based on Gemfile.lock to avoid accidental upgrades before you’re ready.
-
Comment out or isolate incompatible gems temporarily and look for drop-in alternatives on RubyGems.org or GitHub.
-
Use Railsup, our free gems compatibility checker, to identify which gems won’t work with your target Rails version.
Configuration File Divergences
What breaks:
As Rails evolves, it introduces new config defaults and deprecates older settings. Your existing files (like application.rb or environment configs) may be missing key updates or using legacy options.
What helps:
-
Create a new Rails app with the same target version, and compare the config directory against your current app.
-
Use rails app:update to generate updated files, but don’t auto-merge. Do manually bring in only the changes you need.
-
Remove deprecated keys (Rails will often warn you in logs).
-
If you’re migrating from secrets.yml to credentials.yml.enc, make sure your team is aligned on secret management. Version mismatches here can break deploys.
Autoloading and Zeitwerk Compatibility
What breaks:
Since Rails 6, Zeitwerk has been the default autoloader. It’s stricter about file paths and naming conventions than older autoloading (aka "classic" mode).
What helps:
-
Run rails zeitwerk:check to catch misnamed files or unresolvable classes.
-
Refactor class and module definitions to match file paths exactly (UserService goes in user_service.rb, not UserServices.rb).
-
Add custom inflections if needed (API => Api, for example).
-
Use Rails.autoloaders.main.ignore for non-critical files that break convention.
-
For complex setups, preload custom code from lib/ using a loader file like** lib/default_requires.rb**.
Dependency Conflicts and Breaking Changes
What breaks:
Some gems or internal APIs may introduce breaking changes that ripple through your codebase.
What helps:
-
Read changelogs for both Rails and your key gems. Especially for gems that extend ActiveRecord, ActiveJob, or ActionController.
-
Search your codebase for internal methods or monkey patches that might break.
-
Use rubocop-rails and update .rubocop.yml to reflect the new syntax and style rules.
-
Suppress or tag warnings in the interim, not everything has to be fixed immediately, but it should be tracked.
Test Failures and Runtime Bugs
What breaks:
Even if the app boots fine, subtle changes in behavior (like parameter handling, callbacks, or defaults) can break features.
What helps:
-
Run your full test suite after every milestone (especially after upgrading to each new version).
-
Strengthen test coverage before you begin, especially around fragile areas like metaprogramming, callbacks, or form handling.
-
Use feature flags or separate branches to decouple the upgrade work from active production development.
Tools and Gems That Facilitate the Upgrade Process
A successful Rails upgrade depends on using the right tools and gems. This can save you hours of guesswork, reduce manual errors, and give your team better visibility into risks and upgrade blockers.
Here’s a practical list of tools and gems that can help streamline your upgrade journey:
1. RailsDiff (Tool)
A web-based tool that compares differences between two Rails versions (e.g., from 5.2 to 6.1). It highlights changes to default files like application.rb, environment configs, initializers, and other relevant configuration files. This helps you understand what you’re missing in your app’s current config and what Rails now expects.
2. Ruby Changelog (Tool)
A valuable resource when upgrading Ruby itself. You can use it to review language-level changes, including new syntax, method deprecations, or behavioral shifts, before updating your Ruby version. This helps prevent silent issues that emerge post-upgrade.
3. rails_best_practices (Gem)
A static code analyzer that flags outdated or suboptimal Rails conventions. It’s especially handy for legacy codebases, helping clean up anti-patterns and making the app more idiomatic and easier to maintain during and after the upgrade.
4. rails_deprecated_sanitizer (Gem)
This gem scans your codebase for deprecated methods and patterns specific to Rails. It’s helpful when you’re dealing with older versions and want to proactively resolve deprecated APIs before running into hard breaks during the upgrade.
5. bundler-audit (Gem)
Audits your Gemfile.lock for known security vulnerabilities using data from the Ruby advisory database. This is essential both before and after an upgrade. New gem versions can introduce risks, and this gem helps you catch them early.
6. RuboCop / rubocop-rails (Gem)
A linting tool that enforces code style and syntax best practices. The rubocop-rails extension includes Rails-specific checks that help clean up deprecated syntax and align your codebase with newer Rails conventions, reducing friction during the upgrade.
7. Reek (Gem)
Detects "code smells" in your application — areas that may lead to technical debt or bugs.
By flagging issues like long methods, duplicate code, and bloated classes, Reek helps you refactor before an upgrade, making your app leaner and more maintainable.
Futureproofing After the Upgrade
Upgrading Rails isn't a one-time cleanup, rather it needs a maintenance mindset. Once you've completed a major upgrade, the real win is making sure the next one is easier. Here's how to stay ready.
Stay current with patch releases and minor versions
Once you're on a stable major version (say, Rails 7.1), keep up with patch and minor updates. These often include security fixes, performance improvements, and subtle changes that are easier to adopt in small increments. Make it a habit to bump patch versions during regular development cycles and don’t wait for a crisis.
Make upgrade-readiness part of your workflow
Small things add up. During feature work, start treating upgrade blockers as part of tech debt cleanup. Examples:
- Replace deprecated methods as you touch legacy code
- Avoid adding new gems that don’t support the latest Rails versions
- Use RuboCop and standardrb to catch outdated patterns early
This keeps your codebase from drifting too far behind and lowers the effort needed for future upgrades.
Set up CI/CD pipelines to support upgrade momentum
- Use your CI system to run tests against multiple Rails versions if you're dual booting.
- Automate lint checks for deprecated usage.
- Even better, set up an "upgrade check" workflow that runs with new Rails versions to catch breaking changes early. You can also make it a habit to run a tool like RailsUp before each upgrade cycle. It gives you a heads-up on which gems are ready, which ones might block you, and where to plan workarounds.
- Always create reusable documentation or checklists so the next upgrade doesn’t start from scratch and goes smoothly.
Conclusion: Don’t Let Rails Debt Slow You Down
Postponing a Rails upgrade might seem like a cost-saving move until outdated dependencies, security gaps, and performance issues start adding up. When technical debt creeps in slowly, it will hit you hard. Your team gets stuck with unexpected challenges instead of building new features.
On the other hand, teams that stay current avoid compatibility chaos, reduce security risks, improve test suite reliability, and make future upgrades less painful. Upgrading ruby on rails application isn’t just a maintenance task but a way to keep your development workflow predictable, your team efficient, and your product moving forward.
If you’re still weighing your options or facing blockers, don’t go at it alone. We help companies untangle upgrade complexity, fix what’s slowing them down, and set their applications up for long-term maintainability.
Whether you need help with your Rails upgrade or just want a second set of eyes on your stack, we’re here to talk.