How to Install Ruby: A Beginner’s Guide to Ruby Setup
Step-by-step guide on how to install Ruby, configure tools, and verify your setup across macOS, Linux, and Windows systems.


Pichandal
Technical Content Writer


Setting up Ruby is easier than many beginners expect when you follow the right steps. This updated 2026 guide explains how to install Ruby, configure your system for development, verify the installation, and run your first Ruby program. By the end, you’ll have a working Ruby environment ready for scripting or frameworks like Ruby on Rails.
Why Learning How to Install Ruby Matters
Ruby is widely known for its developer-friendly syntax and productivity. Created by Yukihiro Matsumoto, Ruby emphasizes simplicity and readability, making it a great language for beginners and experienced developers alike.
According to the Stack Overflow Developer Survey, Ruby continues to be used by thousands of developers globally for web development and automation. On GitHub, Ruby remains among the most active open-source ecosystems thanks to frameworks and libraries built around it.
Understanding how to install Ruby correctly ensures your development environment works smoothly. A clean installation avoids dependency issues, version conflicts, and permission errors later.
Installing Ruby with the right tools also makes it easier to manage versions when working on multiple projects.
How Do You Download and Install Ruby
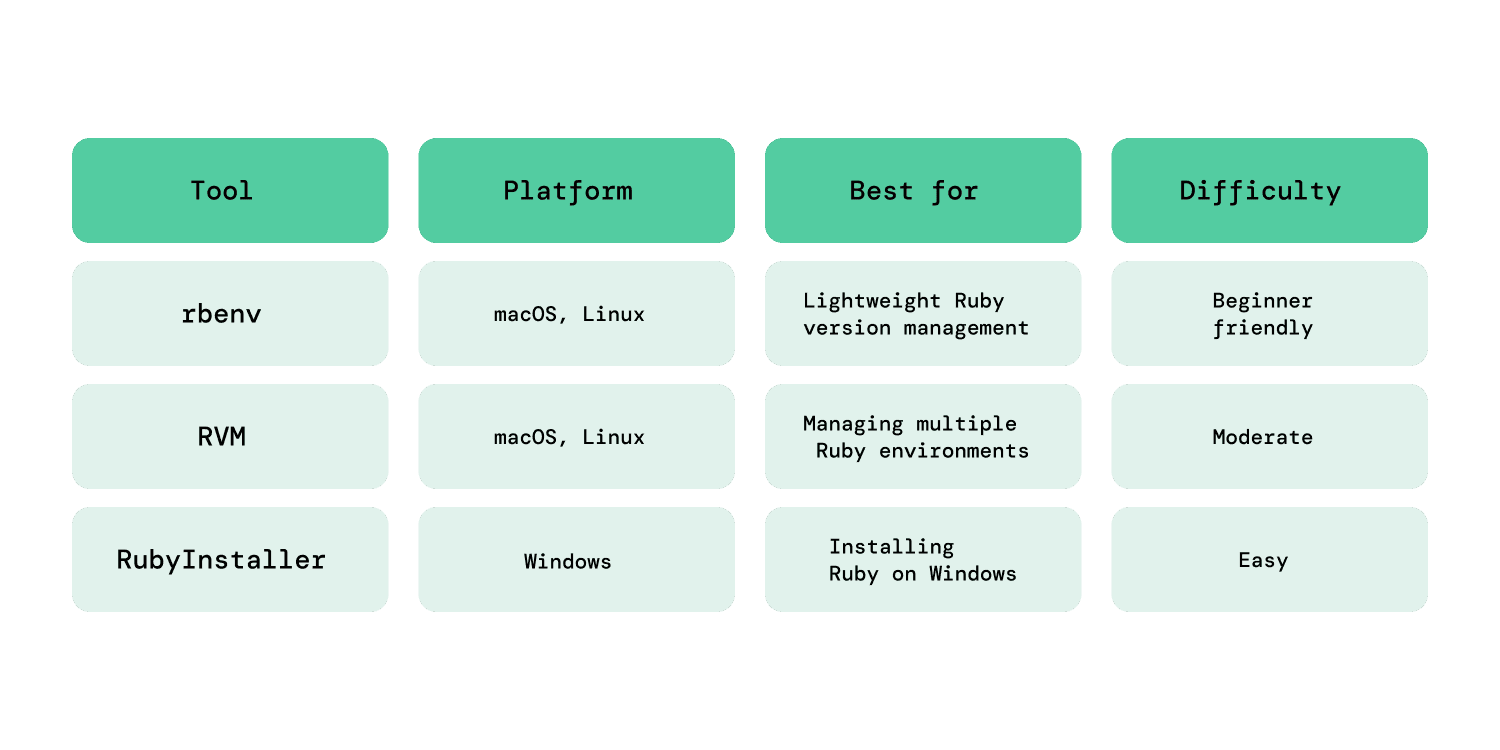
If you're wondering how to install Ruby, the process depends on your operating system. Most developers use a version manager because it allows multiple Ruby versions on the same machine.
A version manager keeps projects isolated and makes upgrades simple.
Pro Tip: Before you begin, visit ruby-lang.org to find the latest stable version number.
Using these tools simplifies Ruby installationand prevents conflicts with system software.
How to Install Ruby on macOS
macOS comes with a "System Ruby" pre-installed, but you should avoid using it for development. It is usually outdated, and modifying it can cause issues with your operating system's stability.
Instead, developers use Homebrew and a version manager like rbenv. This allows you to install the latest version of Ruby into your own user folder without needing "sudo" or administrative permissions.
Follow these steps to install Ruby on macOS.
Step 1: Install Homebrew
Open Terminal and install Homebrew:
/bin/bash -c "$(curl -fsSL https://raw.githubusercontent.com/Homebrew/install/HEAD/install.sh)
Homebrew is a package manager that makes installing development tools easier.
Step 2: Install rbenv
brew install rbenv
Then initialize rbenv:
rbenv init
This command displays setup instructions but does not apply them automatically.
To complete the setup, add the following line to your shell configuration file:
For zsh (default on macOS):
echo 'eval "$(rbenv init -)"' >> ~/.zshrc
Then restart your terminal (Zsh shell) or run:
source ~/.zshrc
For bash:
echo 'eval "$(rbenv init -)"' >> ~/.bash_profile
This ensures rbenv is properly configured and ready to manage Ruby versions.
Step 3: Install Ruby
Now install the latest stable Ruby version:
rbenv install 3.4.0
Set it as the default version:
rbenv global 3.4.0
At this point, you have successfully completed installing Ruby on macOS.
How to Install Ruby on Linux
Linux users usually install Ruby through package managers and version tools.
If you're learning how to install Ruby on Linux, the process is very similar to macOS.
Step 1: Install dependencies
For Ubuntu or Debian systems:
sudo apt update

sudo apt install git curl build-essential libssl-dev libreadline-dev zlib1g-dev
These libraries allow Ruby to compile correctly.
Step 2: Install rbenv
Clone rbenv from GitHub:
git clone https://github.com/rbenv/rbenv.git ~/.rbenv
Add rbenv to your PATH.
echo 'export PATH="$HOME/.rbenv/bin:$PATH"' >> ~/.bashrc
Initialize rbenv:
echo 'eval "$(rbenv init -)"' >> ~/.bashrc
Reload your shell or restart the terminal:
source ~/.bashrc
Now install the ruby-build plugin so that the install command actually works:
mkdir -p "$(rbenv root)"/plugins

git clone https://github.com/rbenv/ruby-build.git "$(rbenv root)"/plugins/ruby-build
Step 3: Install Ruby
Install a Ruby version:
rbenv install 3.4.0
Set it globally:
rbenv global 3.4.0
After these steps, you have successfully completed installing Ruby on Linux.
How to Install Ruby on Windows
Windows developers typically use RubyInstaller, which provides one of the simplest ways to get started with Ruby. It bundles the core Ruby environment along with essential tools required to run and install gems.
If you're learning how to install Ruby on Windows, this method is the quickest way to set up a working development environment without manual configuration.
Follow these steps to install Ruby on Windows.
Step 1: Download RubyInstaller
Download the installer from the official RubyInstaller website.
Choose the latest stable version and run the installer.
Step 2: Install Ruby and DevKit
During installation, enable the DevKit option. DevKit includes essential build tools required for installing Ruby libraries.
Make sure the option to add Ruby to your PATH is selected.
Step 3: Verify installation
After installation, open Command Prompt and run:
ruby -v
If the version number appears, Ruby on windows has been installed successfully.
Some developers also use Windows Subsystem for Linux for a Linux-like development environment.
Tip: Use WSL2 for a Better Ruby Setup on Windows
If you plan to build applications using Ruby on Rails, consider using Windows Subsystem for Linux (WSL2) instead of installing Ruby directly on Windows.
WSL2 provides a Linux-compatible environment, making Ruby development more stable and closer to real production setups.
Many developers prefer WSL2 because it reduces issues with gems and system dependencies.
How Do You Configure Your System for Ruby Development?
After learning Ruby installation process, the next step is configuring the development environment.
A proper configuration ensures Ruby projects run consistently across machines.
Install Ruby package management tools
Ruby uses RubyGems to manage libraries called gems, which are reusable pieces of code that extend Ruby’s functionality. Most Ruby installations already include RubyGems by default, so you can start installing gems right away.
To manage dependencies within a project, you should also install Bundler. Bundler ensures that your project uses the correct versions of gems across different environments.
Install Bundler using:
gem install bundler
Bundler ensures all developers on a project use the same gem versions.
Set up a development workflow
Developers typically work with:
-
Terminal or command line
-
A code editor
-
Ruby version managers
After completing these steps, your system is fully prepared for Ruby development.
How Do You Verify Your Ruby Installation?
Once you understand how to install Ruby, you should confirm the installation works correctly.
Run the following commands in the terminal.
ruby -v
This command displays the installed Ruby version.
gem -v
This checks whether RubyGems is installed properly.
which ruby
This shows the path where Ruby is installed.
You can also open the interactive Ruby console using IRB:
irb
Inside IRB, type:
puts "Ruby works!"
If the message prints successfully, your Ruby installation is working correctly.
First Steps After Setting Up Ruby
Now that you know how to install Ruby, it’s time to try a simple program and explore the ecosystem.
Create your first Ruby script
Create a file called:
hello.rb
Add this code:
puts "Hello, Ruby!"
Run the script using:
ruby hello.rb
Seeing output on the terminal confirms that your Ruby environment works.
Try the Ruby interactive console
Use IRB to test commands quickly.
Example:
5 + 5
IRB immediately returns the result.
Install your first gem
You can install Ruby libraries using RubyGems.
Example:
gem install sinatra
This installs Sinatra, a lightweight framework for building web applications.
Explore Ruby frameworks
Many developers eventually use Ruby on Rails, one of the most popular Ruby frameworks.
Rails provides tools for building full-featured web applications quickly, following conventions that reduce the need for repetitive configuration.
With Rails, you can:
-
Build database-backed applications using built-in ORM (Active Record)
-
Handle routing, controllers, and views in a structured way
-
Use generators to scaffold features quickly
-
Access a large ecosystem of plugins and libraries
Rails is widely used for startups and MVP development because it allows teams to move fast without building everything from scratch.
If you’re not ready for a full framework, you can also try Sinatra, a lightweight alternative that’s great for small apps and APIs.
As you start building real applications with Ruby on Rails, you might reach a point where scaling becomes important. In such cases, many teams choose to hire Ruby on Rails developers to accelerate development and ensure best practices are followed.
Conclusion
Learning how to install Ruby correctly sets the foundation for everything that follows in your development journey. A clean setup ensures fewer errors, smoother workflows, and a better learning experience from day one.
In this step by step installation guide for Ruby, you’ve seen how to install Ruby across macOS, Linux, and Windows, configure essential tools like rbenv and Bundler, and verify that everything works as expected.
From here, the next step is simple, start building. Try small scripts, explore gems, and gradually move toward frameworks like Ruby on Rails to create real-world applications.
Ruby rewards experimentation. The more you build, the more intuitive it becomes. So instead of overthinking the next step, open your editor and start coding.
If you're setting up Ruby for a real project or planning to build with Ruby on Rails, getting the setup right from the start makes a big difference. If you’d like a second set of eyes or guidance, you can reach out to the team at RailsFactory to discuss your requirements.
FAQs
1. Is Ruby on Rails still relevant in 2026?
Yes, Ruby on Rails remains relevant in 2026, especially for startups, MVPs, and web applications that prioritize rapid development. It continues to evolve with modern features, security updates, and strong community support.
2. What is Ruby used for?
Ruby is mainly used for web development, scripting, automation, and building backend systems. It powers frameworks like Ruby on Rails and is also used for prototyping and API development.
3. Is Ruby software free?
Yes, Ruby is free and open-source software. It is distributed under a flexible license that allows developers to use, modify, and distribute it without cost.
4. What are the advantages of Ruby?
Ruby offers several advantages, including clean and readable syntax, strong community support, and high developer productivity. It also has a rich ecosystem of libraries and frameworks like Ruby on Rails.
5. Is Python or Ruby faster?
In most cases, Python is slightly faster than Ruby in raw performance. However, the difference is often minimal for typical web applications, where development speed and maintainability matter more.
6. Why do people still use Ruby?
Developers still use Ruby because of its simplicity, productivity, and strong ecosystem. Frameworks like Ruby on Rails allow teams to build applications quickly and maintain clean codebases.