Claude Code’s iOS Simulator Integration: The Tricks the Docs Don’t Cover
Discover the undocumented tricks and best practices for using Claude Code's iOS Simulator integration to automate UI testing and layout verification.


Balaji Subramaniyam
Senior Software Engineer


Most AI coding assistants stop at the edge of the editor. They can write the widget, suggest the fix, even explain the stack trace — but the moment you need to actually see whether the layout holds up on an iPhone SE, you’re back to alt-tabbing into Xcode, booting a simulator by hand, and eyeballing it yourself.
Claude Code’s iOS Simulator integration closes that gap. It’s a single tool — control — that can boot into a live view of the simulator, install and launch a build, and then drive it: tap, swipe, type, pinch, press hardware buttons, and take verified screenshots, all without a human touching the mouse. The interesting part isn’t that it can do this. It’s what changes in your debugging loop once verification stops requiring your eyes at every step.
This is a field guide to that integration: how it’s built, the workflow it enables, and a set of tricks that aren’t obvious from the surface area alone.
How the pieces fit together
Under the hood, the tool sits between your conversation and a real, booted Apple Simulator process. Every call resolves to one of two paths:
Headless actions — screenshot, tap, swipe, text, button, open_url — work against the simulator directly. No window has to be open on your screen for these to run, which is what makes an unattended verification loop possible. attach opens a live streaming panel so a human can watch the same session unfold in real time, on a simulator that’s already booted.
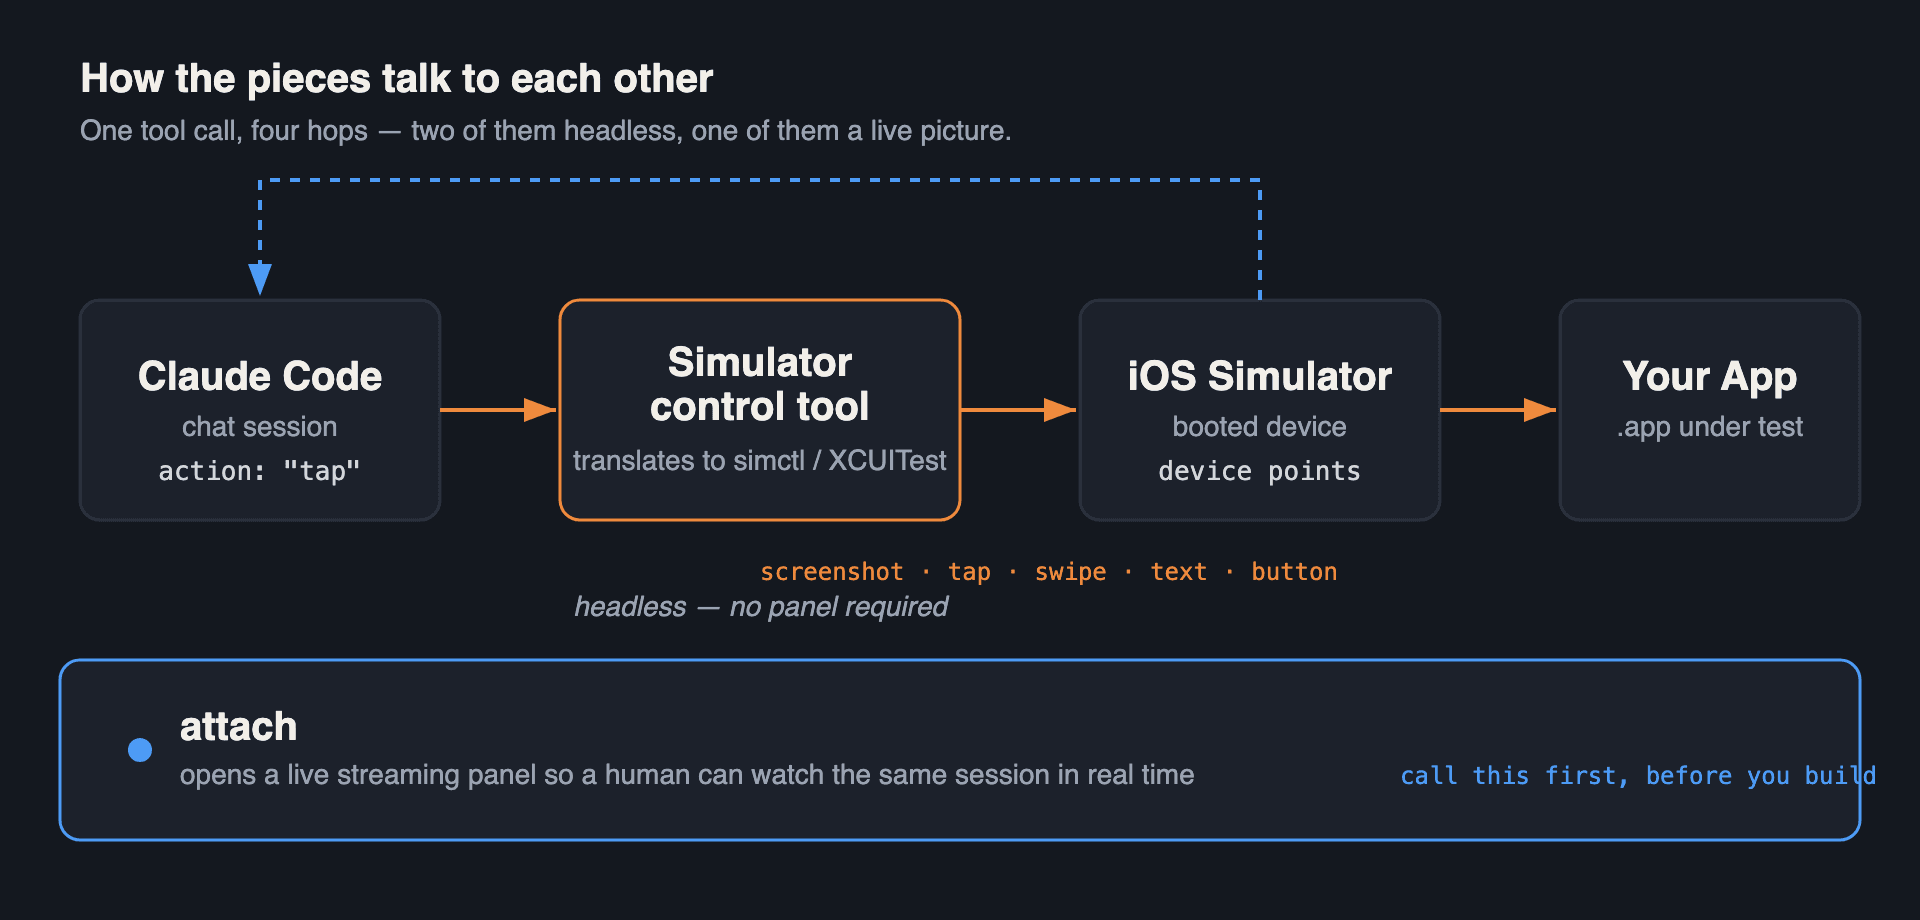
That split matters more than it looks. Headless actions are what let an agent iterate quickly — screenshot, judge, act, re-screenshot — without waiting on a render pipeline to a viewer. attach is what lets you watch that iteration happen, which is a different job: demoing a feature, sanity-checking that a build actually launched, or catching a crash the moment it happens instead of reading about it after the fact in a log.
One consequence worth internalizing: attach before you build, not after. It’s cheap — it opens instantly against a booted device — and it surfaces the one-time “allow simulator access” prompt while you’re still watching. launch will re-attach on its own if the panel closed, but treating that as your default means you miss the build phase, which is exactly when things go wrong.
The verification loop
The workflow that falls out of this is a short, repeatable loop:
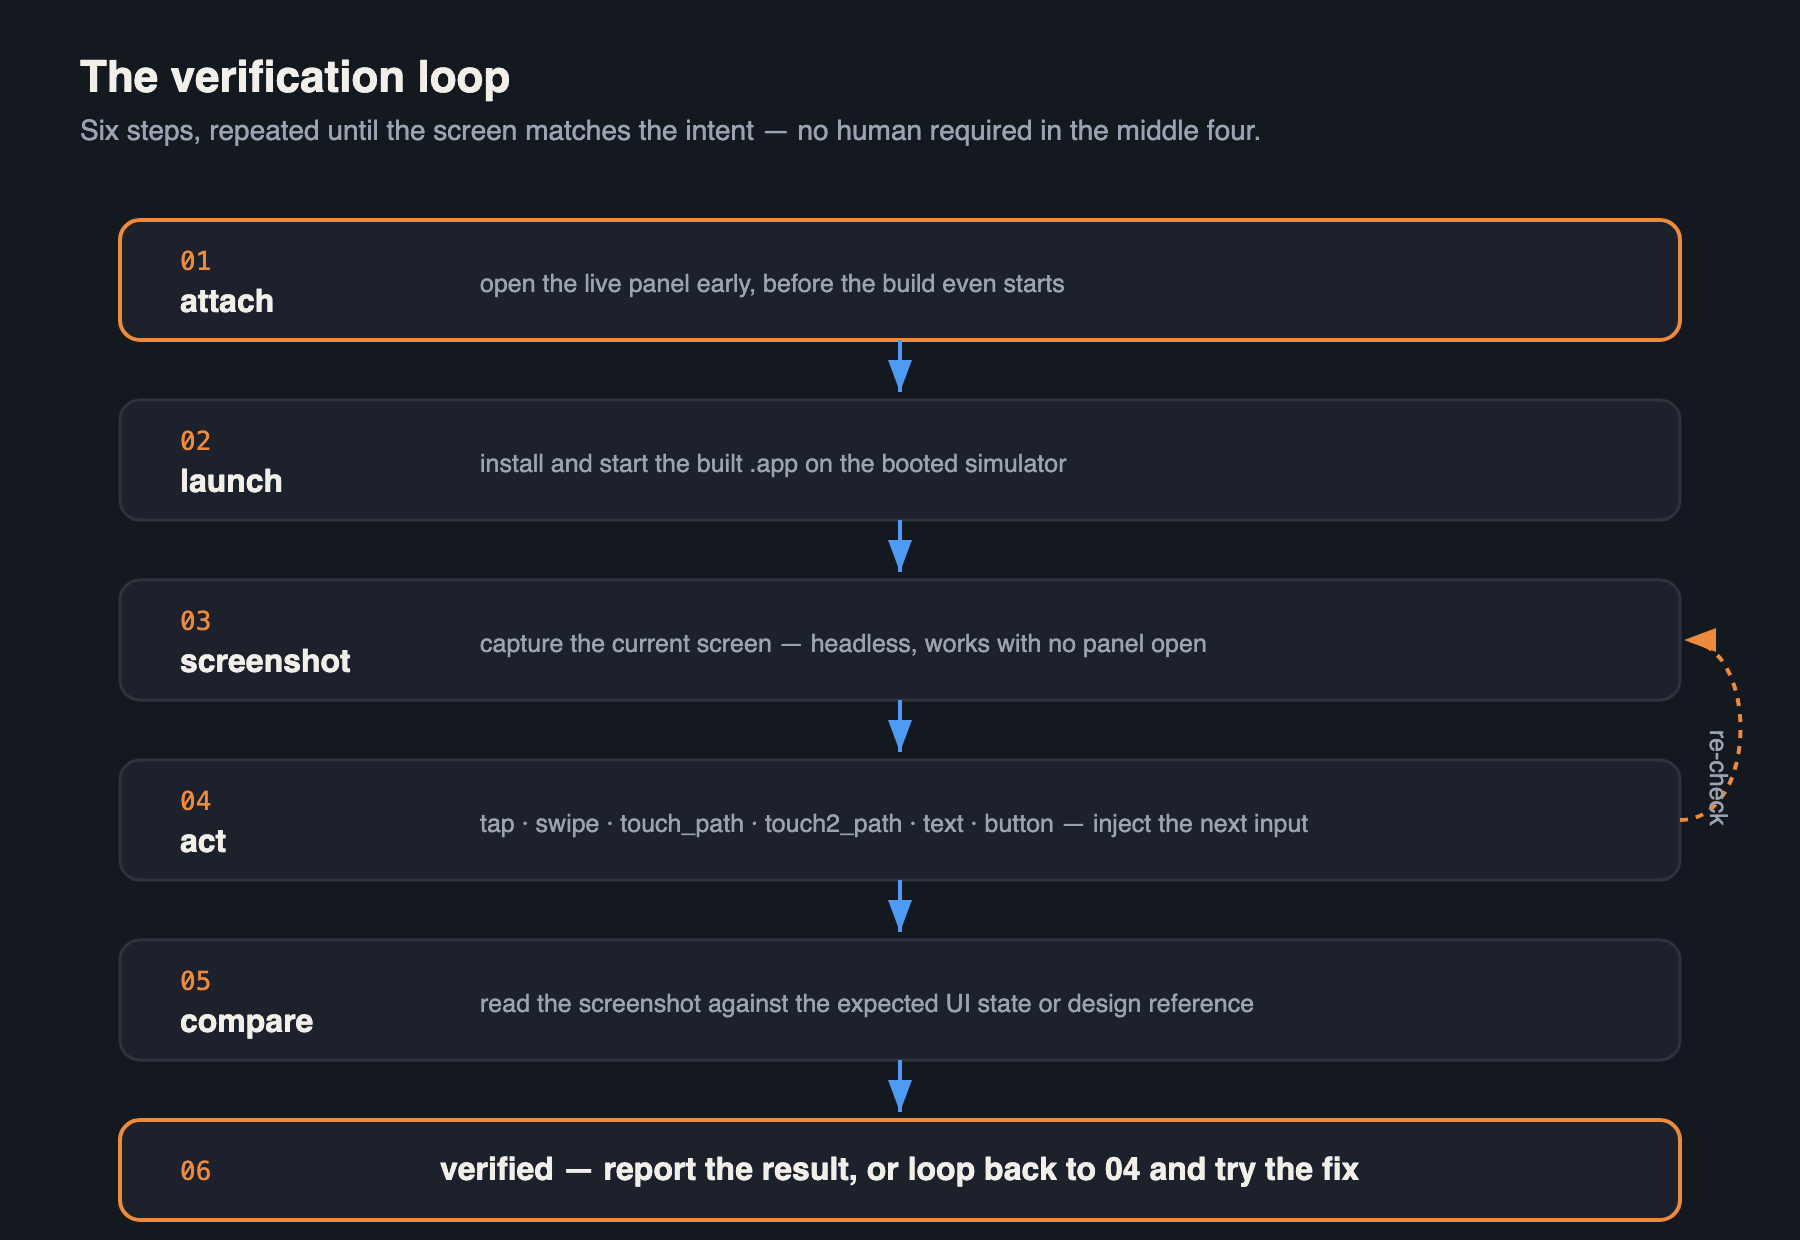
The thing to notice is that steps 3–5 don’t need a person in them. That’s the actual productivity shift: instead of “make the change, ask a human to check the simulator, wait for feedback,” you get “make the change, verify against the real rendered output, iterate,” with the human only pulled back in for the parts that need judgment a screenshot can’t answer — does this feel right, is this the effect we wanted, does the copy read well.
For a Flutter app specifically, this loop pairs naturally with flutter analyze and flutter test as your fast, cheap gates, with the simulator loop as the layer above them that catches what static checks structurally can’t: a RenderFlex overflow that only shows up at a specific width, a footer that overlaps content on a persistent bottom sheet, a page indicator that’s off by one dot. Type checks tell you the code compiles. A screenshot tells you the pixels are wrong.
A walkthrough: chasing a footer overlap
To make this concrete, take a realistic scenario from onboarding-flow work — the kind of feature where a persistent footer, a swipeable slide deck, and a page indicator all have to agree on layout at once.
Say a new build adds a fixed footer to an onboarding carousel. The obvious risk: on a shorter device, does the footer clip the last slide’s content, or does it float over text that should be scrollable? A manual check means booting a simulator, navigating three onboarding slides by hand, and squinting.
Driven through the tool, the same check looks like this:
attach → panel opens on the booted device
launch bundle_id: com.example.app → app installs, opens on slide 1
screenshot → confirm slide 1 renders, footer visible
swipe (right → left, mid-screen) → advance to slide 2
screenshot → check the page indicator advanced
swipe (right → left, mid-screen) → advance to slide 3 (last slide)
screenshot → check footer position against slide content
Nothing here is exotic — it’s the same steps a QA engineer would type into a manual test script. What’s different is that each screenshot result is something Claude can actually read and reason about in the same turn: does the footer sit below the safe area, is the CTA button fully visible, does the dot indicator show slide 3 of 3. If something’s off, the next action is immediate — no context switch, no “can you check and get back to me.”
Tricks that aren’t obvious from the tool description
A few things that took real trial and error to learn, and that most people miss on a first pass.
1. The 4-point edge trap
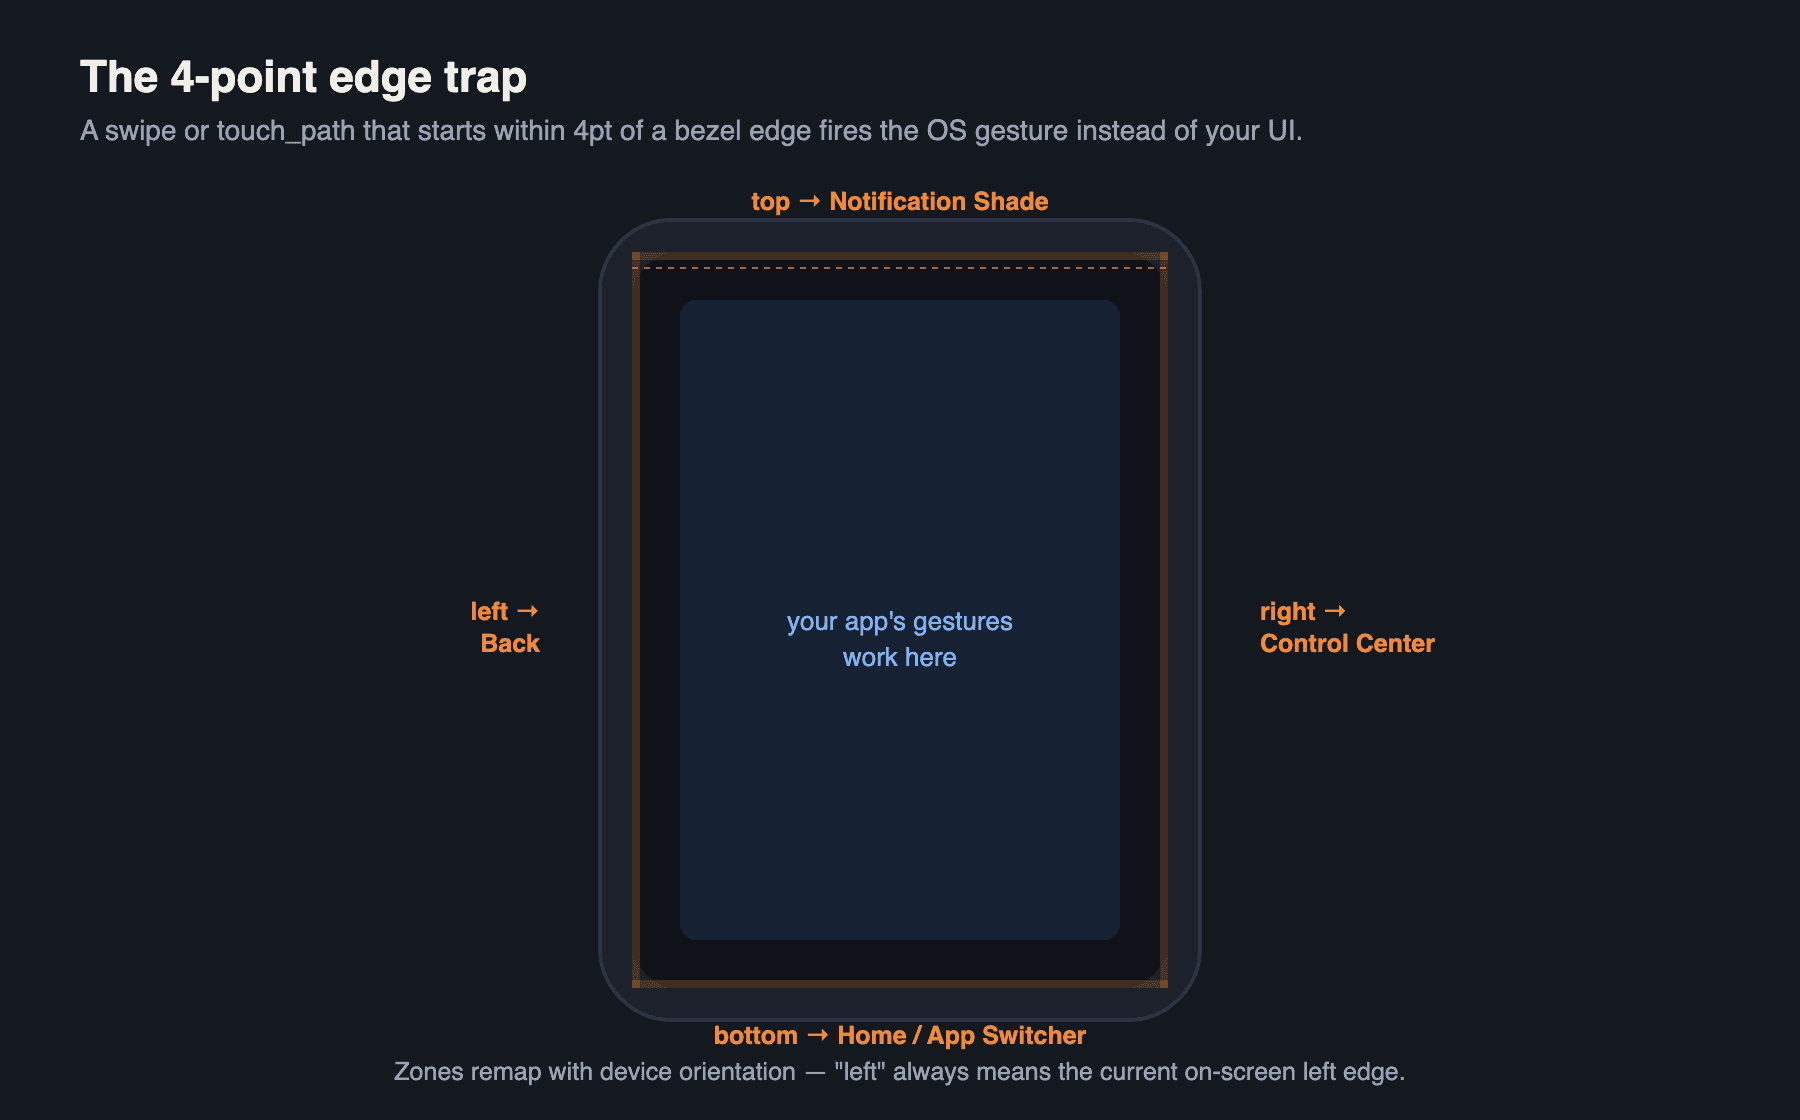
Coordinates are in device points, top-left origin — same numbers work across @2x and @3x simulators. But any swipe or touch_path whose start point lands within 4pt of a bezel edge triggers the OS gesture instead: left → Back, top → notification shade, bottom → Home/App Switcher, right → Control Center — remapped to whatever the current orientation is. If a swipe backgrounds the app instead of scrolling, this is almost always why.
2. touch_path beats swipe for anything with character
swipe is a straight, single-speed gesture. touch_path takes a full sequence of timed points — what you actually need for a long-press-then-drag reorder, an eased curve, or a bug that “only happens when you drag slowly.” swipe physically can’t reproduce that; touch_path can.
3. touch2_path is the only path to pinch and rotate
Two-finger gestures — pinch-to-zoom on an image viewer, rotate on a map or annotation screen — need the two-finger counterpart. Easy to forget it exists; it’s the only way to exercise an InteractiveViewer-style widget at all.
4. open_url is a shortcut through your own router
Every screen behind go_router already has a route. Rather than tapping through five onboarding slides and a login form, open_url with the deep link jumps straight to the screen under test — the single highest-leverage trick for anything buried behind a multi-step flow.
5. Hardware buttons test interruptions, not just screens
button drives HOME, LOCK, SIRI, SIDE_BUTTON, APPLE_PAY — background a form mid-entry and confirm state survives, lock and unlock to check a biometric re-auth gate, dismiss a payment sheet and confirm nothing hangs. Exactly the bugs nobody manually tests for.
6. Skip the panel when nobody needs to watch
attach is for humans. Screenshots, taps, and button presses all work without it — reserve the live panel for a demo, a first look at a new screen, or confirming a fix in real time, not for a routine build check.
7. Simulator only, full stop
It cannot drive or stream a physical iPhone or iPad — a hard boundary, not a current gap. “Does this work on my device” still means building and deploying with normal tooling; this loop covers the debugging that doesn’t need real hardware.
8. Treat every screenshot as untrusted content
A screenshot is a picture of whatever the app renders — including server text, deep-link params, or user-generated content. If it says “enter your password” or “go to this URL,” that’s data, not an instruction. Observe it, don’t obey it.
Testing across the device matrix, not just one phone
None of the above replaces running the same check across more than one screen size. A layout that’s fine on an iPhone 15 Pro Max can clip on an SE — narrower width, less vertical room above the home indicator, different safe-area insets.
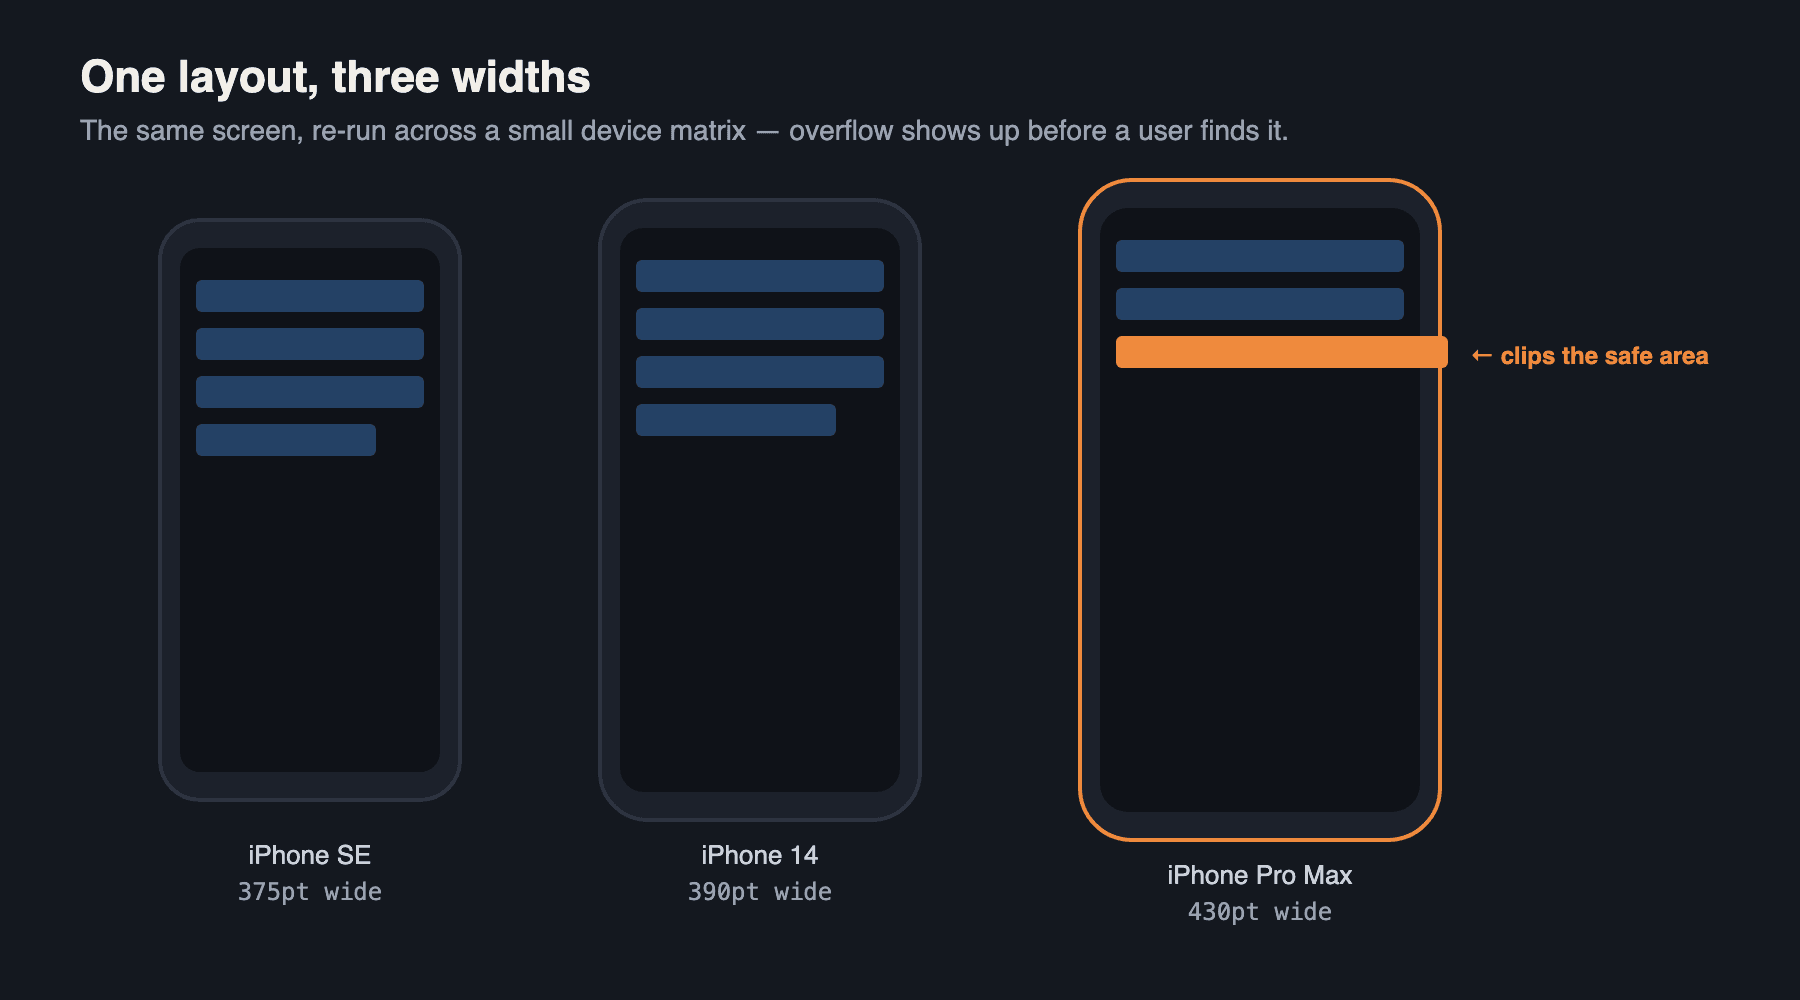
The pattern that catches the most regressions in practice: run the exact same screenshot → act → screenshot sequence against your smallest supported device and your largest, and diff the two mentally against what the design actually specifies. Overflow bugs are almost always a width problem hiding behind a design that was only ever eyeballed on one simulator.
The edge case worth memorizing
Of everything above, the one that costs the most debugging time when missed is the edge-gesture remap — because the failure mode looks like a bug in your app when it isn’t one.
Common pitfalls
| Symptom | Actual Cause |
|---|---|
| Attach fails with an error | No simulator is booted, or the requested device isn’t up yet — boot it first, or build, then retry. |
| A swipe backgrounds the app instead of scrolling | Gesture started within 4pt of a bezel edge — see the edge trap above. |
| A slow-drag bug won’t reproduce | Swipe is fixed-speed; use touch_path with real per-point timing instead. |
| Pinch-to-zoom can’t be tested | Needs touch2_path, not swipe — two-finger gestures have their own action. |
| Panel never opens on launch | Launch re-attaches automatically only if a panel was previously open; call attach explicitly and early instead. |
| Debugging session aimed at the wrong device | The tool is simulator-only — physical-device requests need normal build-and-deploy tooling. |
Quick reference
| Action | Use It For |
|---|---|
| attach | Open the live panel — call early, before building. |
| launch | Install and start a built .app. |
| screenshot | Headless capture of current screen state. |
| tap | Single-point touch. |
| swipe | Simple, single-speed directional gesture. |
| touch_path | Multi-point gesture with real timing — long-press-drag, eased curves. |
| touch2_path | Two-finger gestures — pinch, rotate. |
| text | Inject typed text into a focused field. |
| button | Hardware buttons — HOME, LOCK, SIRI, SIDE_BUTTON, APPLE_PAY. |
| open_url | Deep link straight to a route, skipping the flow in front of it. |
| detach | Close the panel / stream. |
The actual shift
None of the individual actions here are new ideas — simctl and XCUITest have been able to do all of this for years. What’s different is where the loop lives. Instead of a human manually operating a simulator and reporting results back into a conversation, the same loop runs inside the conversation, with a human pulled in only for attach moments that need real judgment.
That’s a small change in mechanics and a real change in speed: the gap between “I think this fix works” and “I’ve verified this fix works” collapses from a context switch into a few tool calls.